Building a Bamboo Rod
Growing up, both my Dad and older brother were (and still are!) fishing mad and so it was no surprise that I caught the bug at a young age.
Although the most basic aim of fishing is to catch fish, I have always felt that not catching can be just as rewarding in the right surroundings; an ethos that I’m sure I have acquired from my Dad. In the past I have done my time sat behind a rod waiting for it to lurch round, but quickly discovered I was too impatient for this type of fishing. I have always had a limited interest in lakes; rivers are far and away my favourite places to be, with fresh water running past all the time, there are never two experiences the same.

In my late teens I began to fly fish and realised that although patience could be important, you could happily wade up a fishless stream all day waving the rod around and be quite content –the fish were just a bonus! I took this philosophy into my coarse fishing and began to actively seek out fish before fishing or at least fishing in places where I could see the fish pick up the bait.

I have always had an interest in old tackle and after using a few old cane rods I began to discover their merits over their ‘plasticy’ cousins, particularly when touch ledgering and registering finicky bites. The natural’ feel and self loading bamboo, at times seem to cast themselves and the joy of catching a fish on one always seems to be amplified. There is also a strong sense of simplicity when using cane coupled with a pin, hook and maybe a swan shot or two that you just cannot recreate with other rods.

After discovering the above, it didn’t take long before I was hooked on bamboo. A friend and I talked about making a rod of our own and with some research we did it.
Firstly, we made planing forms out of maple to allow us to plane the bamboo strips to shape and accurately taper them giving the basis for our rod. It was put together, rings were whipped on and varnish applied to the whole lot. ‘Old Number One’ was born. Itching to give it a go we took it to a local stream and the first swishes of the rod were made. It wasn’t long and I was playing the first fish and what a fight it was! Certainly one I’ll not forget. The rod was hooped over and we were almost expecting something to give (it was a rather through action), but it held out and the fish was landed. We HAD to make more.

We began to break down the process learning as we went. Different people have different ways of doing things and eventually we had ‘our’ way. It can be a painstaking process, with attention to detail never more important than when just a couple of thousandths of an inch can completely transform the finished product. Here’s a basic version of how we do it…
First of all, a piece of Tonkin cane must be picked. This species of cane has dense fibres known as ‘power fibres’ that makes it the perfect species of cane for fishing rods. The fibres give the cane a higher tensile strength than steel, higher compressive strength than concrete and a better weight to strength ration than graphite. Amazing stuff when you consider it can grow a metre a day! The denser the fibres, the stronger the piece.

Once a piece is matched to the taper we’ve chosen, it can be split and flamed. Flaming drives moisture out of the bamboo and it can be seen bubbling out of the ends of the cane. Starting from the middle and working to the ends ensures the moisture is released. The flaming process also tempers and colours the bamboo. The more it’s flamed, the darker it gets.

Once the cane is tempered and coloured it can be split by hand. A ‘froe’ (a knife) is used to start the split before pulling apart by hand. Splitting by hand takes skill to ensure the strips split evenly and ‘straight’. Usually you can get around 12 strips out of half a culm, but this of course depends on the thickness of the strips you need.

After the strips are split, the next step is to lay them out and trim them to the correct length. Cane has nodes along its length and it is good practice to not have all of these grouped in one place on the blank as it can create a ‘weak spot’, for this reason we stagger the nodes. There are many patterns and ways of doing this but it does mean you need a longer length of cane to begin with than the finished blank. On flamed cane the nodes take on a lighter shade once treated (as described later). We tend to favour the spiral pattern as it is not only strong but also aesthetically pleasing.
The butt section of each strip is marked to avoid confusion and then each node is heated with a heat gun and squashed ‘flat’ in a vice. Once each node on each strip is completed, any leftover lumps or bumps are sanded off to leave the enamel side smooth. At this stage, the pith side is less important because this is the side where most of the material is removed from. Again, moderate heat is applied to the strips at certain points to allow them to be bent by hand to make them straight. This is very time consuming but essential for the finished blank.

With the strips prepared, planing can begin. Each strip will need to end up as a 60 degree triangle (6 x 60 = 360) and this is where forms come into play. The forms have a tapered 60 degree groove running down their entire length; this is adjusted with push and pull locking bolts at 5” intervals to allow us to set the groove to the correct dimensions for any given rod. A dial test indicator is placed into the groove to measure the depth and then the form is adjusted until the desired depth is reached. The push pull bolts are locked to ensure the forms don’t move.

Before the ‘square’ strip can be placed into the groove we must first make the initial 60 degree angle. This is done on a special wooden roughing form which enables us to make the first angle which in turn allows the strip to sit properly in the 60 degree groove of the final planing form.
With all the strips rough planed, the final tapering can begin. It is essential that the blade in the plane is extremely sharp; this will allow clean cuts and multiple passes over the cane where just thousandths of an inch are removed from the bamboo. If the plane is incorrectly set it is much more likely that the blade will ‘dig’ into the cane and the strip will be wasted. The strip is placed in the tapered groove of the form and numerous careful ‘passes’ are made with the plane until it is flush with the top of the steel form. Once the plane no longer removes any material the strip is finished with a scraper which removes the final bits. The strip is turned over and the enamel side is scraped a few times to remove loose material. The strips are checked for accuracy with callipers and the angles are inspected.

 Next comes the gluing stage. The 6 strips are taped together in the correct order so as to not disturb the nodal spacing we set up earlier. The tape is sliced on one edge to allow us to ‘unfold’ the strips and apply the glue. A liberal coating of glue is applied to all the strips and quickly they are ‘folded’ back together. String is used to bind the strips tightly together, it is important to put the correct pressure on the string and we find it much easier to regulate this by hand rather than with a machine. Excess glue is wiped off and the blank is straightened one last time before it is hung to dry. Once dry, the string can be removed and any excess glue that was missed can be carefully sanded off. We now have our basic blank.

It is at this stage that any final straightening must be completed. It’s almost impossible to get the rod perfectly straight from butt to tip due to the organic nature of the material, however with care and attention it is possible to get it pretty damn close!
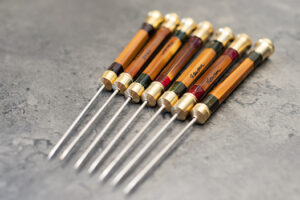
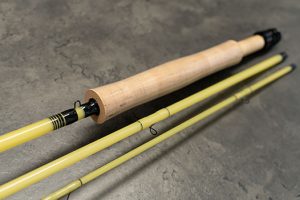
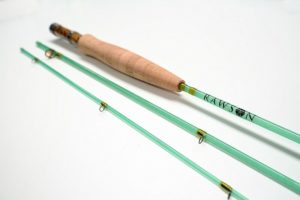
The next steps are to make all the hardware for the rod. A cork handle is turned on our Myford lathe, matched in length to each individual rod and shaped to the customer’s requirements. Aluminium butt caps are made for our coarse rods whereas the fly rods have a hardwood reelseat turned and shaped before the bands and caps are machined to match.

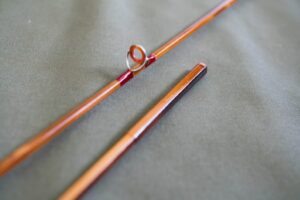
Before they can be fitted, we must find the ‘spine’ of the rod. This is the flat that the rings will oppose. This is done by ‘flicking’ the rod between your fingers. The spine should have a slightly different ‘flick’ to the rest of the flats. Once this is found, the handle and/or reelseat can be glued in place accordingly.
Next up are the ferrules. Once turned and assembled, they are ‘blued’ to make them less shiny and give them a protective finish. These too are then glued into place after doing the necessary calculations to ensure both sections are of the same length.
The rod then goes into the finishing stages. The blank is marked out as to where the ring spacing should be. The correct sized rings are then taped onto the blank and the spacings are given a final testing against the stress curve of the taper. If correct then whipping can begin…
Fine silk is used to whip the rings on, the silk needs to be tensioned perfectly to achieve an even colour in the final wrap. Too tight and the varnish doesn’t penetrate fully, too loose and the ring isn’t properly secured. Care must be taken to not overlap the thread turns to keep the whippings as ‘flat’ as possible. Once the wrap is complete, it is burnished with a flame to get rid of the ‘fluffies’. When all the whippings are complete our finish is applied to them. The thread turns translucent as the finish saturates the silk; as a result the thread is turned darker than the original colour. Although a colour preserver could be used to prevent this, using this method can also lead to cracks appearing further down the line.

The aim of varnishing the whippings is to fill the voids between thread turns to give them a ‘flat’ appearance that is aesthetically pleasing. To get them as flat as possible the finish is lightly sanded in between coats taking great care not to ‘tear’ into the thread. Once this is achieved we can move onto finishing the blank.
There are a number of options when finishing the blank but we like to pour several coats of our thinned finish down the blank vertically. We sand in between coats to keep a nice even finish being sure to let it dry fully before sanding. After several coats the rod begins to look like a finished product and bar a few final checks and a polish, it is!

It’s very hard to put into words how the process is achieved without going into too much detail and it sounding like a list of boring steps, hopefully I’ve kept is as short and informative as possible! Although this is not a ‘how-to’, with any luck you now have an insight into what we do. There are a lot of variables and more advanced techniques used to produce other features such as swelled butts, mortised butts and hollow building etc… but I think we’ll save that for next time!

A lovely Pike falls to a Rawson & Perrin 8′ #5